First Steps
Welcome to the Bot Platform documentation! This guide will help you understand how to create, configure, and deploy intelligent conversational bots using our platform.
Documentation Structure
Our documentation is divided into the following main areas to guide you through all aspects of bot development:
Bot Management
Configure and manage your bot instances, including:
- Settings - Customize bot name, description, visual tags (DEV/STAGING/PROD), and define your bot's personality
- Providers - Configure AI providers (OpenAI, Azure, etc.) for chat and embedding models
- API Keys - Manage API authentication and access
- Versions - Create and manage different bot versions
Content Management
Manage your bot's knowledge and conversational logic:
- Flows - Design conversational flows using various nodes for interaction logic
- Knowledge - Upload documents (PDF, TXT, DOCX, MD), texts, or website content to build your bot's knowledge base
- Scripts - Add custom code snippets for advanced functionality
- Media - Manage media resources such as images, documents, audio, or video files
- ConfigMap - Store configuration values, API keys, and environment-specific settings
Channels
Deploy your bot across various communication channels:
- Website - Embed your bot on websites with customizable design and chat widgets
- Phone - Configure voice-based interactions with STT/TTS settings
- IMAP Mail - Manage email-based conversations
- Knowledge Manager - Edit knowledge access across channels
Testing
Ensure your bot functions as expected with automated tests:
- Create test cases from real conversations
- Define validation conditions for bot responses
- Automate regression tests for your flows
Dashboard & Analytics
Monitor and analyze your bot's performance:
- Analytics - Track conversations, user engagement, and performance metrics
- History - Review conversation logs and user interactions
Livechat
Enable handoff to human agents and live support:
- Overview - Monitor agent activity and conversation distribution
- Chats - Manage your active conversations
- Groups - Organize agents into teams
- Settings - Configure livechat parameters
Create Your First Bot: Step by Step
Follow this guide to create and deploy your first conversational bot:
Step 1: Create Your Bot
Explanation: The following describes the individual steps to initialize a bot.
- Navigate to the Overview page
- Click the Plus button (+) to create a new bot
- Configure your bot's Settings (name, description, visual tag)
- Hover your mouse at the left edge to expand the menu bar. There you will find all relevant sub-items for bot creation.
Step 2: AI Provider Configuration
Explanation: The system uses multiple specialized providers for operation, including chat generation, vectorization of knowledge texts (embeddings), and telephony and voice services.
- Go to the Providers section
- Add your AI provider credentials (OpenAI, Azure, etc.)
- Select a Chat Model for generating responses
- Select an Embedding Model if you want to use knowledge-based features
- Activate the provider and set it as default
Step 3: Add Knowledge (Optional)
Explanation: In this step, external, domain-specific knowledge in the form of documents, texts, or URLs is ingested, vectorized (embeddings), and stored in a knowledge base to enable contextually relevant and precise answers through Retrieval-Augmented Generation (RAG).
- Navigate to Knowledge under Content
- Upload relevant documents, add text content, or provide URLs
- Use Tags to prioritize specific knowledge for certain topics
- Your bot will use this knowledge to provide accurate, context-aware responses
Step 4: Design Conversational Flows
Explanation: In this step, you design your bot's interaction logic by creating flows from individual nodes. A flow defines how the bot responds to user queries, collects information, retrieves knowledge, or executes external actions. There is a distinction between main flows and subflows. Main flows are autonomous conversational paths that the bot selects based on the user's query. This is where the orchestrator comes into play: it analyzes the user's input, recognizes the intent, and decides which main flow to trigger. Subflows are reusable components that are called within main flows, for example for authentication or recurring dialogue patterns.
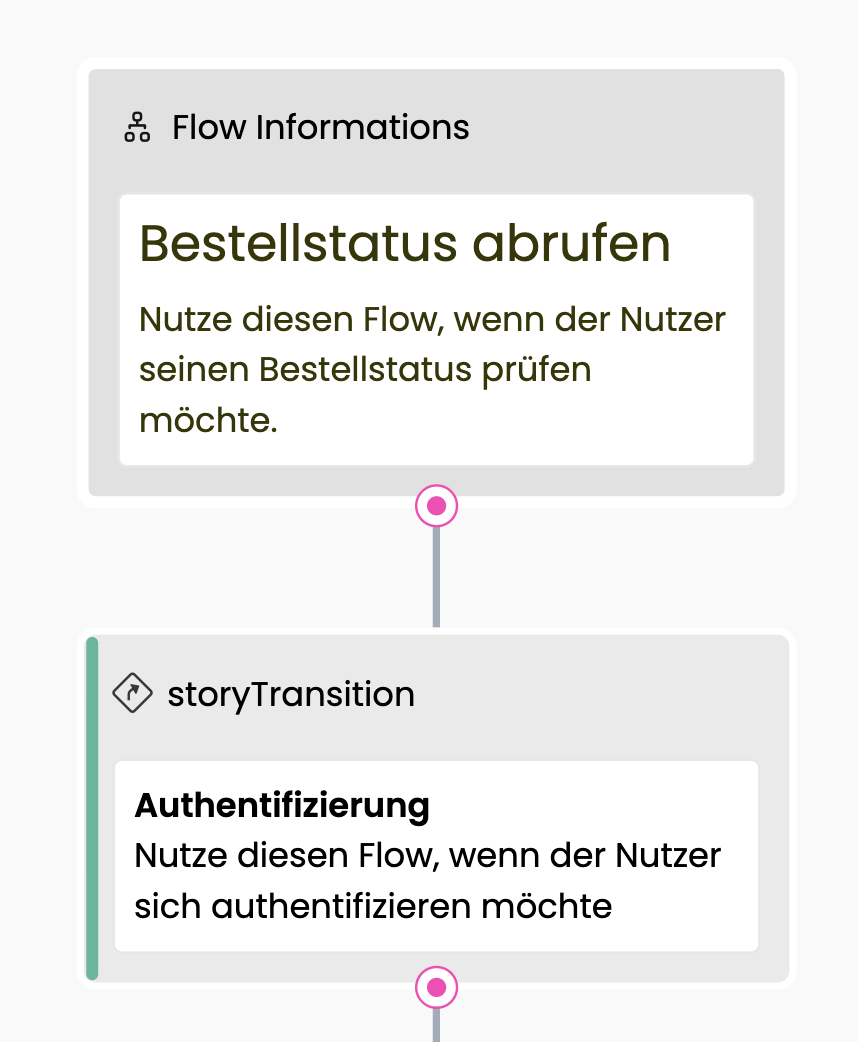
A typical example is a support flow for order status, where only registered users are allowed to access information. The orchestrator recognizes that the user's query contains keywords like "order" or "shipment" and automatically selects the main flow "retrieve order status."

Right at the beginning, the main flow calls a "Authentication" subflow, which verifies the user's login.
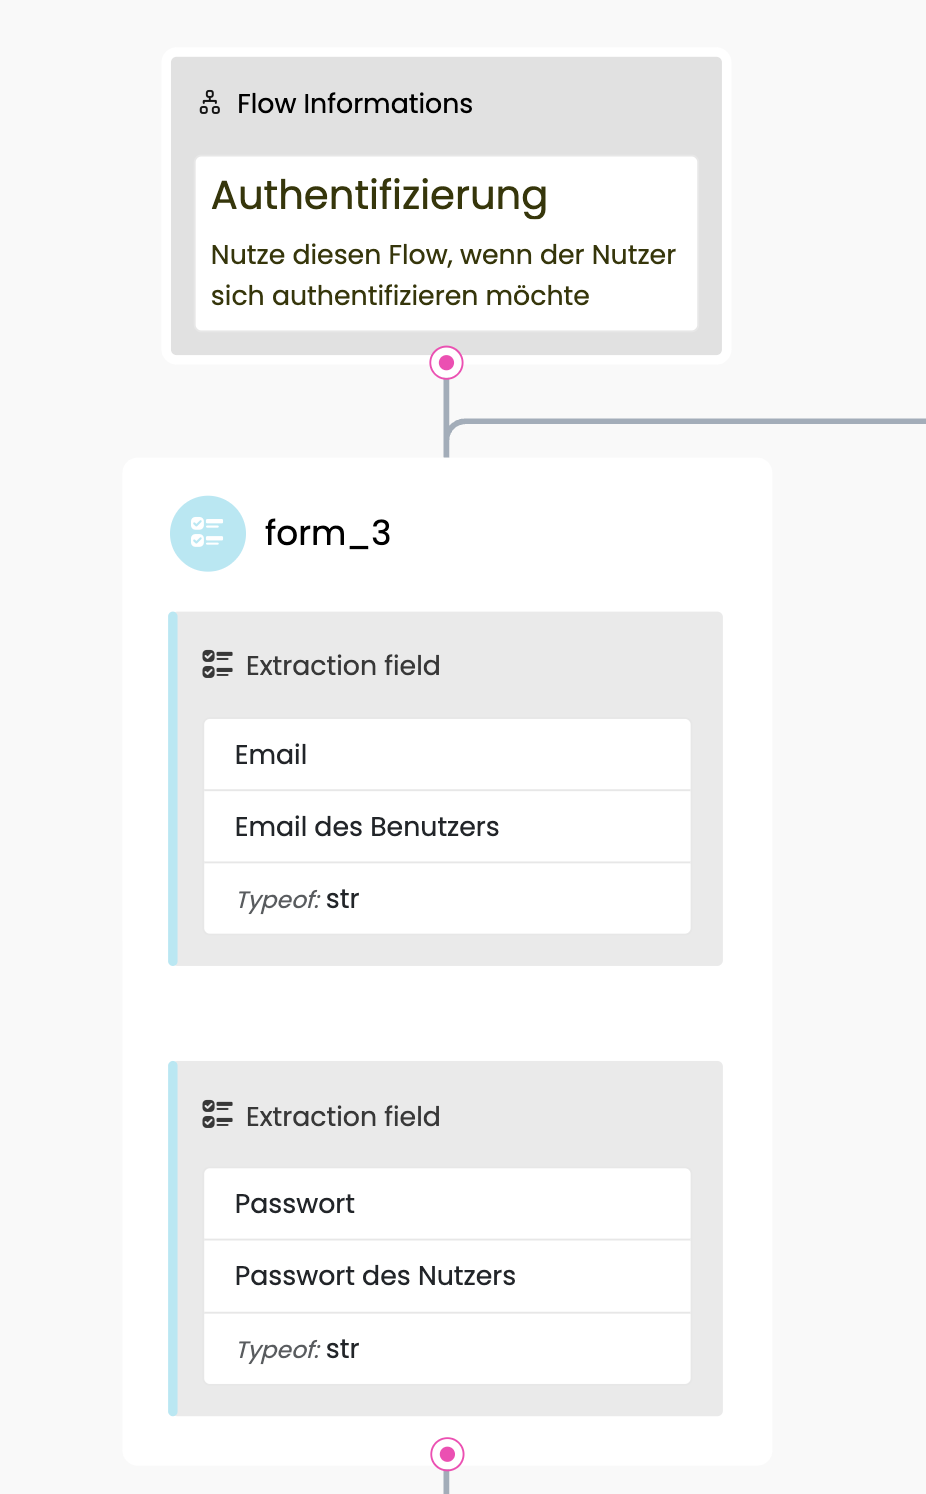
In this subflow, the user is first asked for email and password (form node), and an action node checks the inputs against the authentication system.
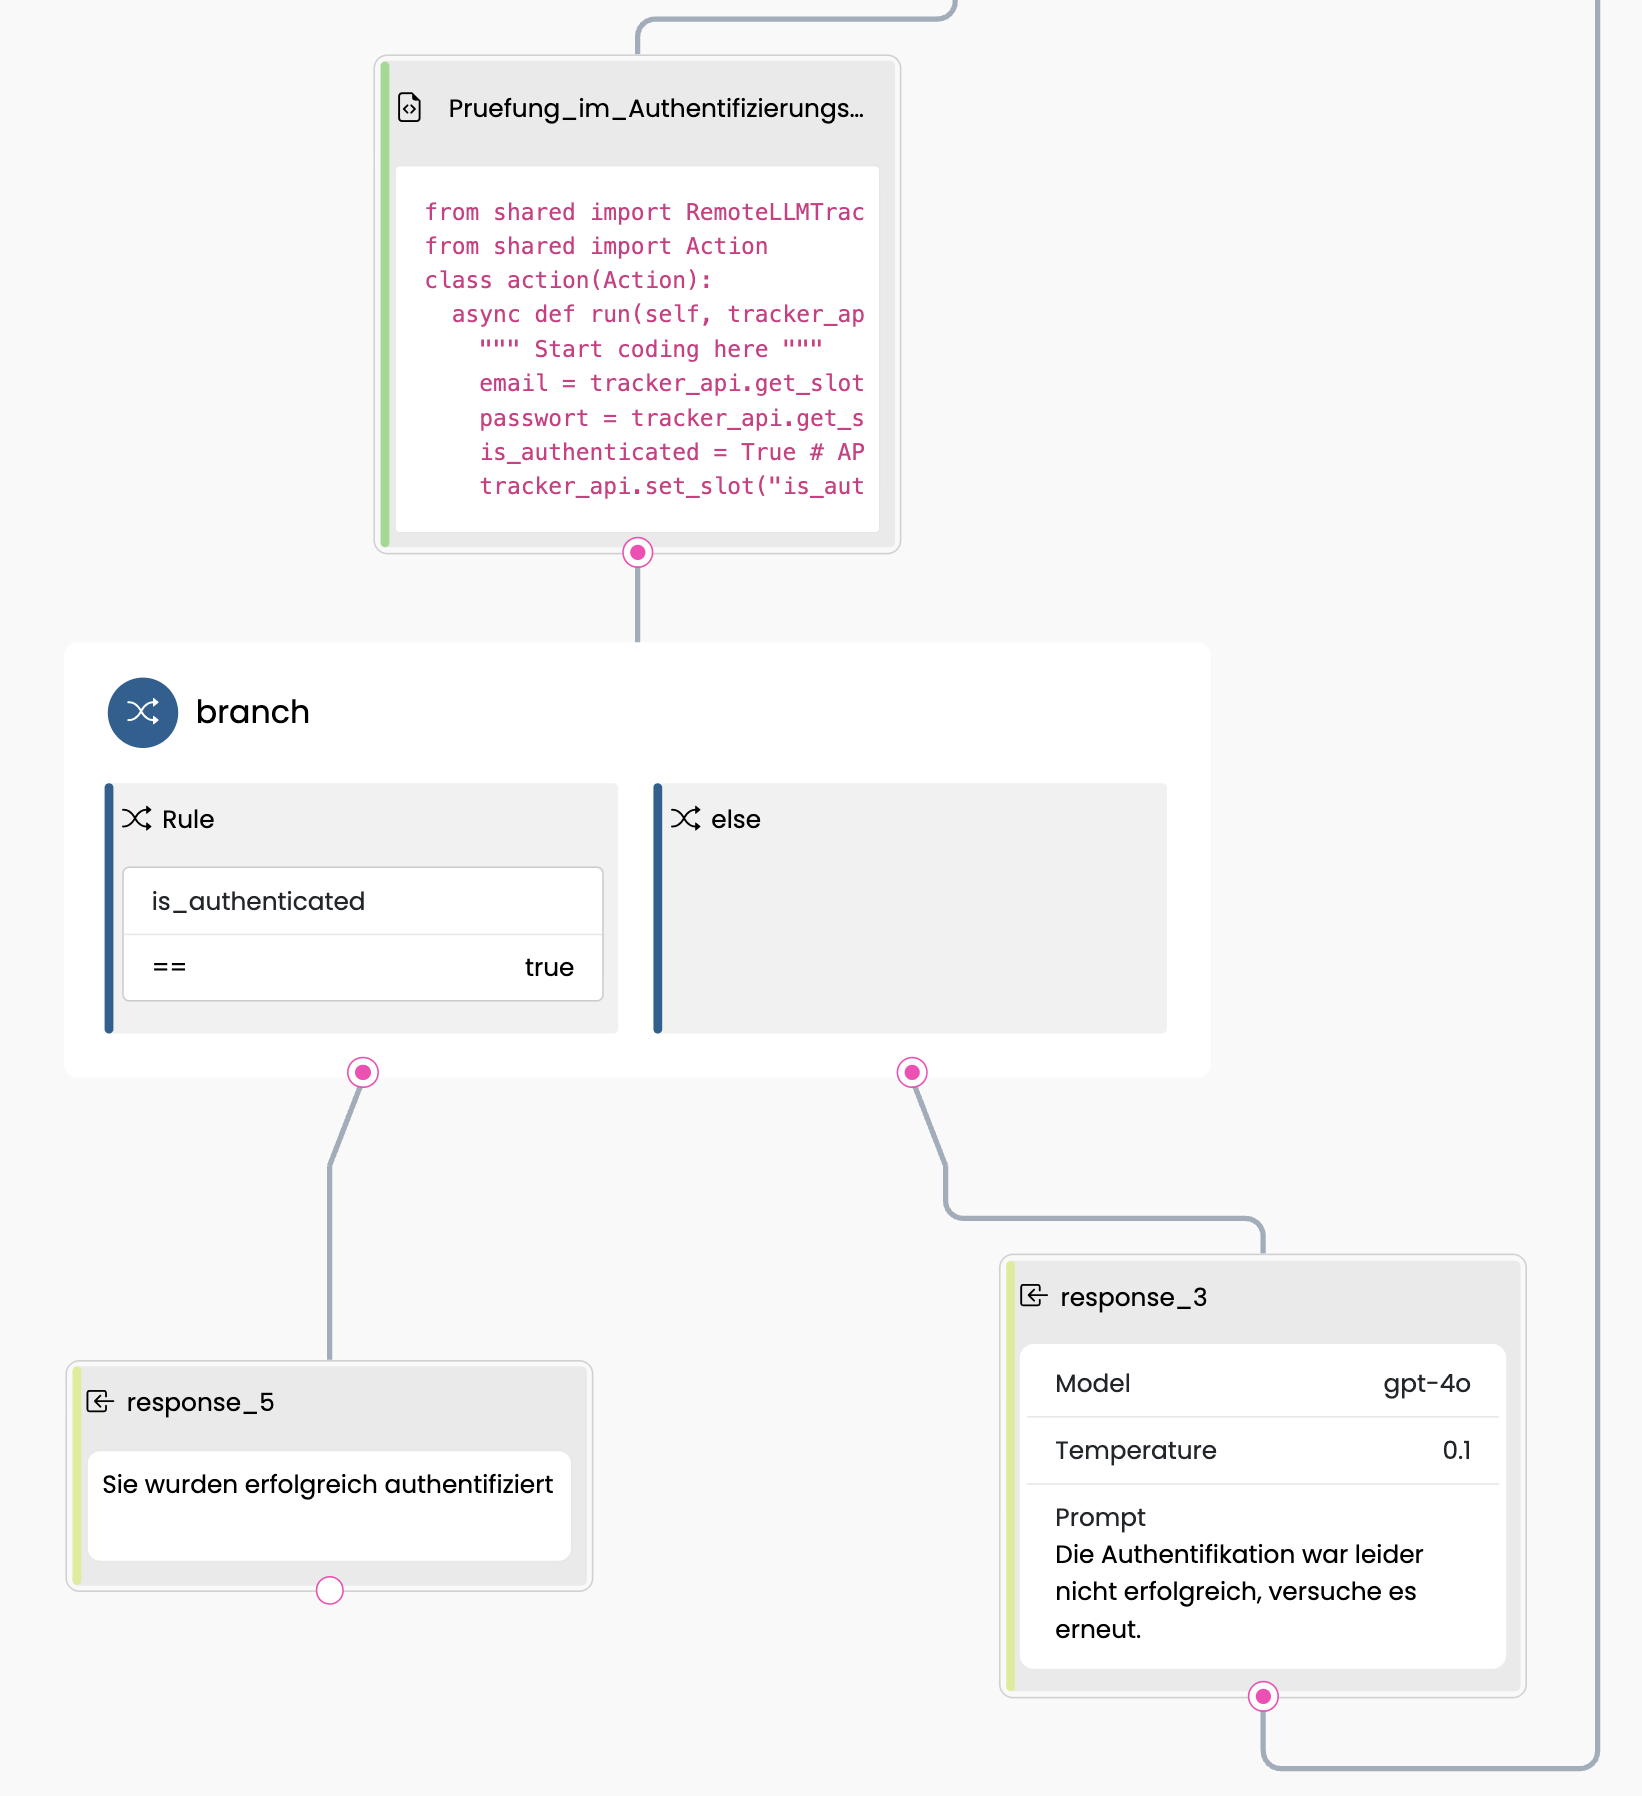
Upon successful login, the flow returns to the main flow; upon failed login, the user receives an appropriate error message and can try again.
Back in the main flow, the bot first requests the order number (either via a form node or a response node with question → user input node → form node, see screenshot). In the form node, instructions for extraction are added in the process description.
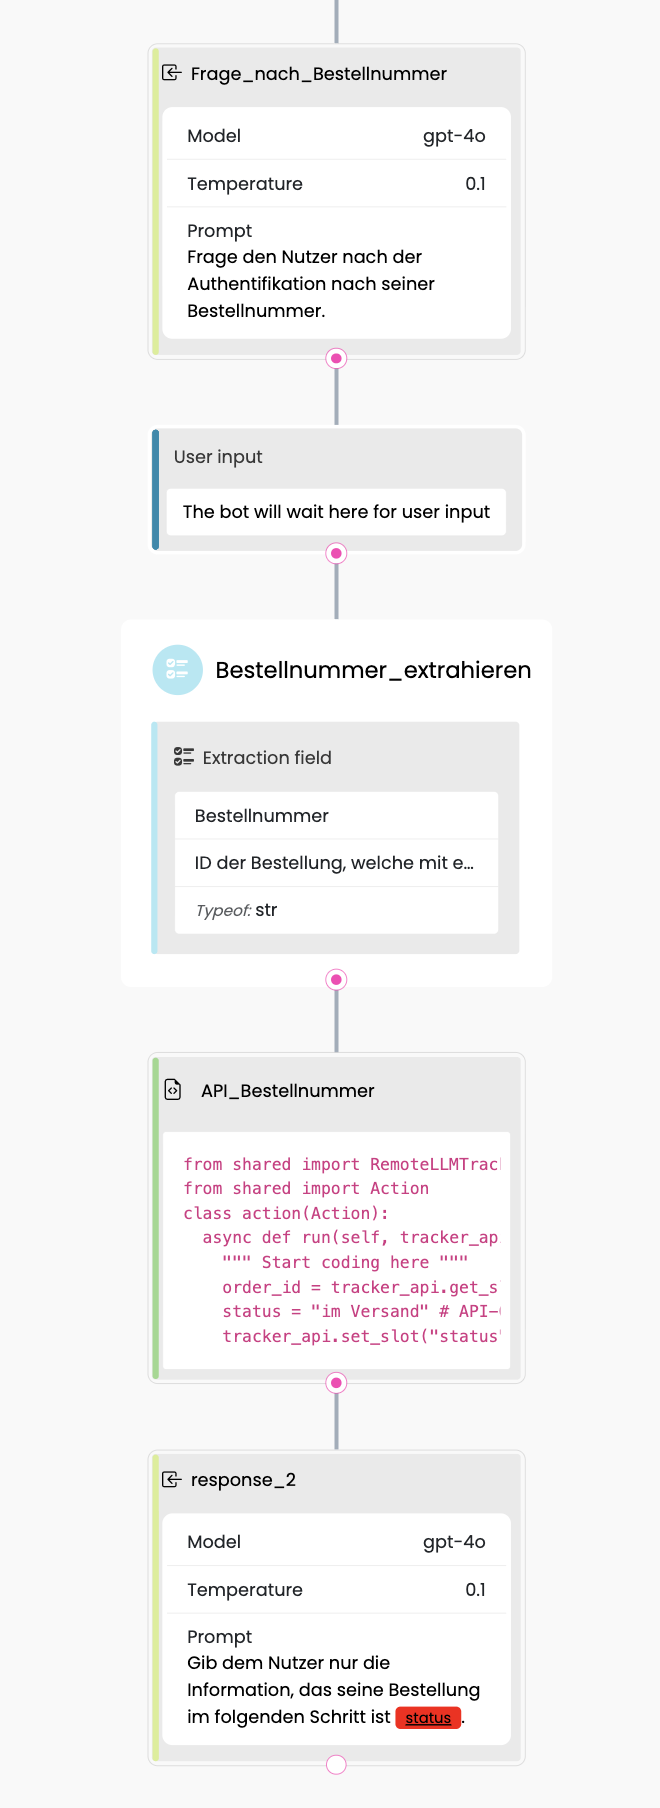
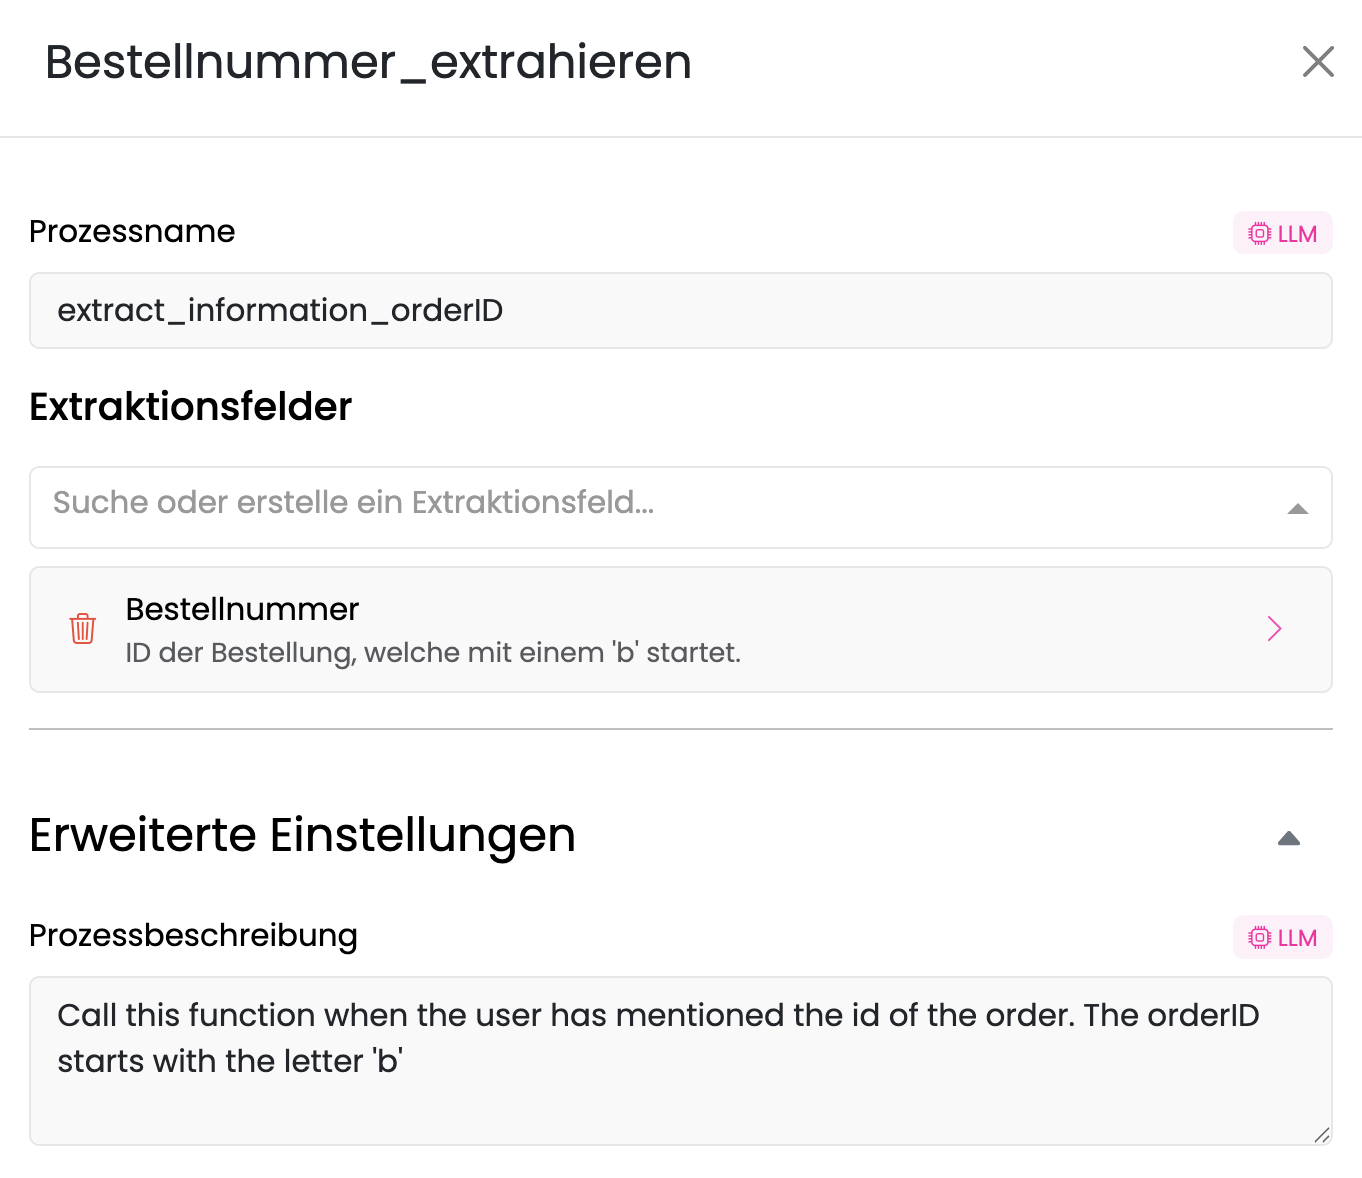
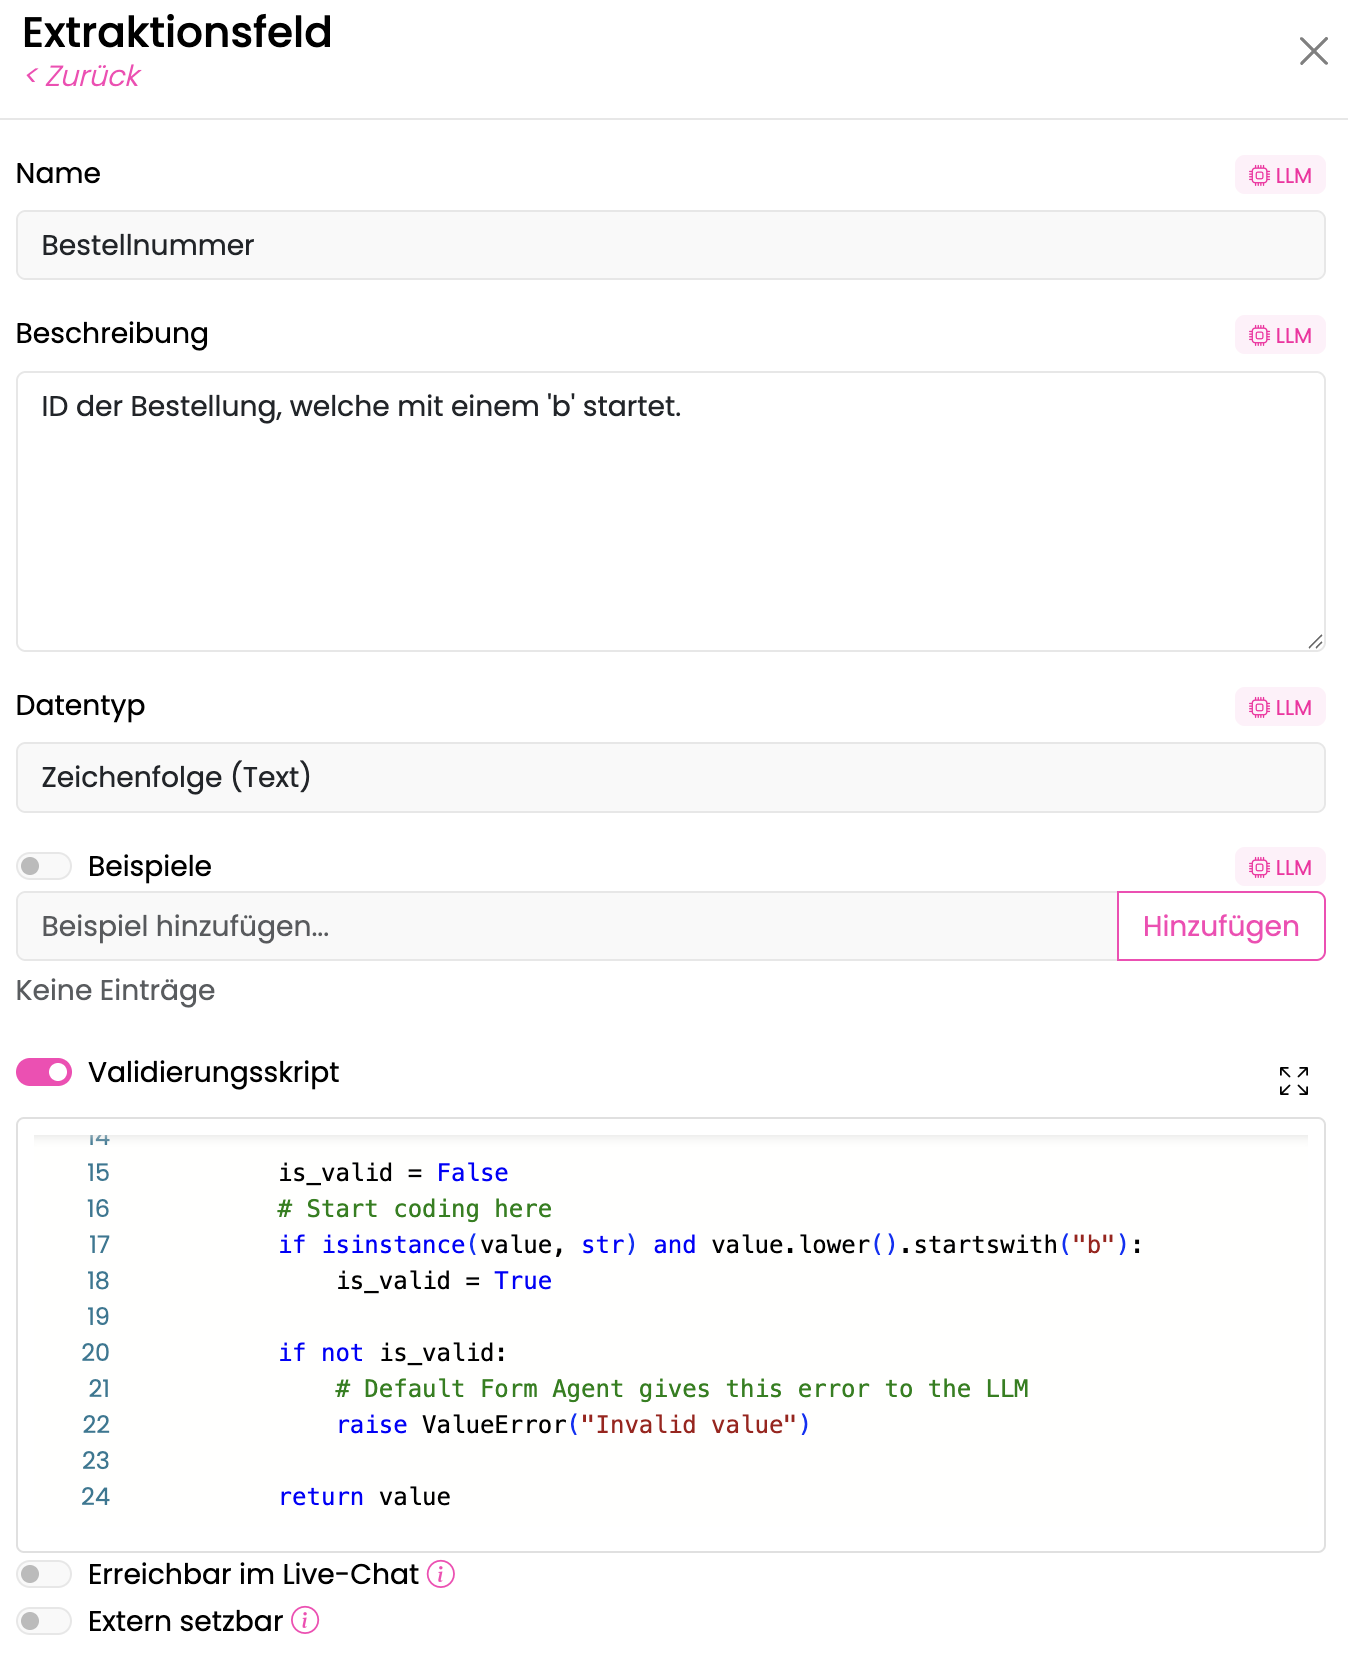
After successful extraction, the validation script is called and checks whether the extracted order number starts with a "b". Then the bot makes an API call to the order system to retrieve the current data.
Finally, a response node delivers the answer to the user: for example, "Your order with number X is currently in shipment."
By separating main flows and subflows and using the orchestrator, the conversational logic remains clear, reusable, and secure. Recurring components like authentication or API calls can be used in multiple flows without duplicating the logic.
- Go to Flows under Content
- Click Create to create a new flow
- Define the flow's purpose and trigger conditions
- Add Nodes to design the conversational logic:
- Form nodes for questions and extraction of user inputs
- Response nodes for answers or questions
- User input nodes through which users provide information
- Knowledge nodes for knowledge retrieval
- Action nodes for logic or API requests
- Set one flow as your Default Flow to handle general queries
Step 5: Configure Your Channel
Explanation: In this step, you set up the channel through which users interact with your bot. This can be your website, a messenger, or another platform. You customize the appearance and basic settings.
- Visit the Website section (or your preferred channel)
- Customize the bot's appearance (avatar, colors, icon)
- Set up an initial message to greet users
- Configure CORS settings for your domain
- Copy the embed code to add the bot to your website
Step 6: Test Your Bot
Explanation: Before going live with the bot, all conversations should be tested. This ensures that intents, flows, and knowledge work correctly.
- Use the Development Chat available on every page to test conversations
- Create automated test cases from your conversations
- Add conditions to validate bot behavior
- Run tests before deploying updates
Step 7: Monitor & Optimize
Explanation: A bot is never "finished." Monitoring and optimization ensure that it remains accurate, helpful, and user-friendly over time.
- Check the Analytics dashboard for insights
- Review conversation History to identify issues
- Enable Livechat for human agent support when needed
- Continuously refine your flows and knowledge base based on user interactions
Key Concepts
Flows vs. Subflows
- Flows are autonomous conversational paths that the orchestrator can select based on user intent
- Subflows are reusable conversational components that must be triggered manually
- Default Flow handles all queries when no specific flow matches
Knowledge Management
- Upload various document types to create a knowledge base
- Use Tags to prioritize specific knowledge for certain topics
- The embedding model converts documents into searchable chunks
- RAG (Retrieval-Augmented Generation) nodes retrieve relevant knowledge during conversations
Visual Tags
Use visual tags to manage different bot versions:
- DEV - Development and testing
- STAGING - Pre-production validation
- PROD - Live production environment
Provider Configuration
- Chat Model - Generates conversational responses
- Embedding Model - Enables knowledge retrieval and search
- Orchestrator - Determines which flow to use based on user input
Bot Persona
Define your bot's personality and communication style in the Settings. The bot persona is automatically applied to all agent responses, ensuring consistent tone and behavior across Response Nodes, Knowledge Nodes, Form Nodes, and the Orchestrator. See the Settings page for details on how to configure and use the bot persona.
Next Steps
Now that you understand the platform structure, here are some recommended paths:
For Quick Start:
- Start with a template bot from the Overview
- Explore the Development Chat to test interactions
- Review the pre-configured flows and knowledge
For Custom Development:
- Learn more about Flow Design and node types
- Understand how to build knowledge bases
- Explore advanced features like Scripts and ConfigMap
For Production Deployment:
- Set up proper Provider Configurations
- Configure API Keys for security
- Create version copies for safe deployments
- Enable Analytics and Livechat for monitoring
Need Help?
- Use the Development Chat to test your bot in real-time
- Create test cases from conversations to debug issues
- Check the Analytics dashboard to identify problem areas
- Review History logs for detailed conversation traces
Good luck building your bot!