Knowledge Manager
TL;DR: The Knowledge Manager is a dedicated channel for internal users to chat with your bot using filtered knowledge through tags and quick-access action buttons. Must be enabled at tenant level first. Perfect for support teams who need focused, context-aware conversations with workflow shortcuts.
The Knowledge Manager channel provides a specialized frontend application designed for internal knowledge workers, support teams, and specialized users who need enhanced control over bot conversations through tag-based knowledge filtering and pre-configured action buttons.
Why Use Knowledge Manager?
Unlike the public Website channel, the Knowledge Manager is built for internal use cases where users need:
- Focused knowledge access - Filter bot responses by selecting relevant tags
- Quick workflow execution - Trigger specific flows instantly with action buttons
- Context control - Choose which knowledge domains the bot should prioritize
- Authenticated access - Secure, role-based access for internal users
- Streamlined interface - Purpose-built for knowledge work, not customer-facing chat
Think of it as a power-user interface for your bot, optimized for internal teams who need precise control over context and workflows.
Enabling the Knowledge Manager
Tenant-Level Activation (Required First)
Before you can use the Knowledge Manager for any bot, it must be enabled at the tenant/instance level. This is a one-time setup performed by:
- System administrators through tenant configuration
- Environment variable configuration
- Knowledge Manager frontend application deployment
Important: Without tenant-level activation, the Knowledge Manager channel will not appear in the bot configuration options.
Bot-Level Activation
Once the tenant-level setup is complete, enable the Knowledge Manager for your specific bot:
- Navigate to Channels → Knowledge Manager in the sidebar.
- Toggle the switch in the top to enable the channel.
- Configure your tags and action buttons (see below).
- Click Save to apply your configuration.
Your bot is now accessible through the Knowledge Manager frontend application (https://knowledge.{DOMAIN}) for authorized users.
User-based Sessions
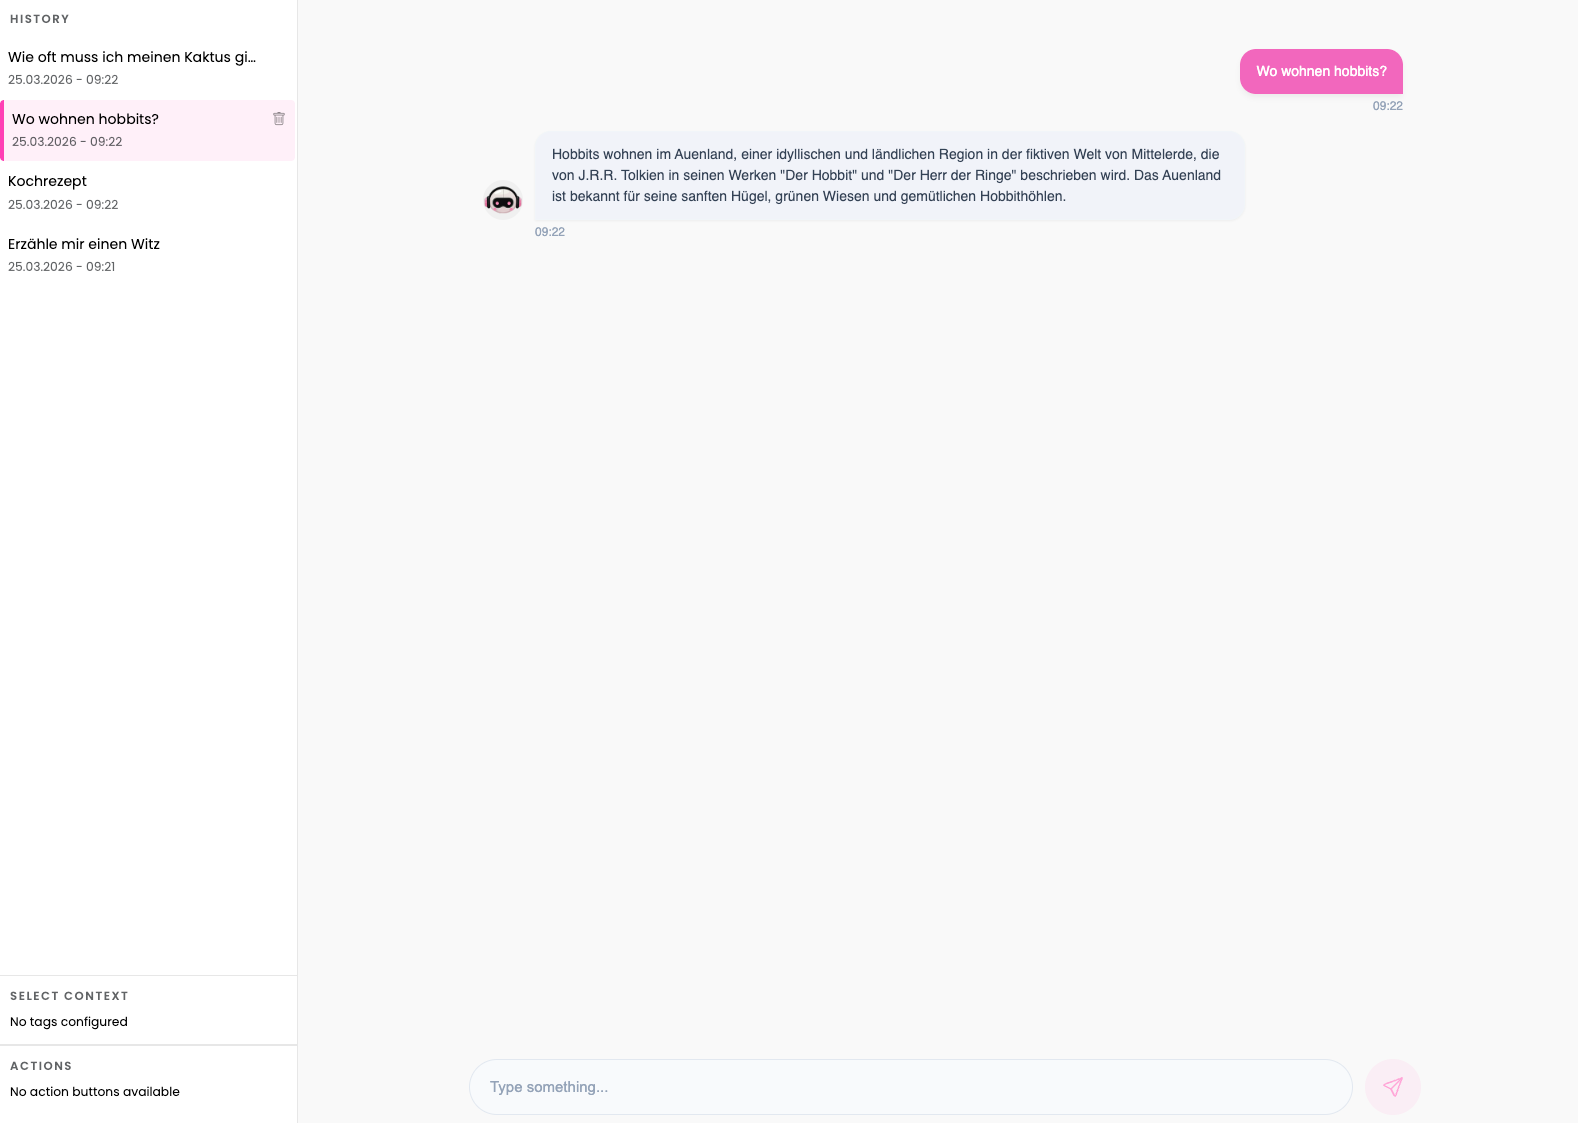
The User-based Sessions setting enables personalized conversation history for each authenticated user. When enabled, users can view and resume their previous conversations directly from the Knowledge Manager sidebar.
Enabling User-based Sessions
- Navigate to Channels → Knowledge Manager
- In the Settings card, check the User-based Sessions checkbox
- Click Save to apply
How It Works
When User-based Sessions is enabled:
- A History panel appears in the sidebar showing the user's previous conversations
- Each entry displays the first message and timestamp of the conversation
- Clicking a history entry loads and continues that conversation
- Each history entry has a delete button that allows users to permanently remove individual conversations
- Conversations are linked to the authenticated user's identity
- Only the current user's conversations are visible (not shared across users)
This feature is particularly useful for:
- Conversation continuity - Users can pick up where they left off
- Reference lookup - Quickly find previous answers or information
- Audit trails - Track personal interaction history with the bot
Deleting Chat History
Users have full control over their conversation history:
- Hover over any history entry to reveal the delete button
- Click the delete button to permanently remove that conversation
- Deleted conversations cannot be recovered
- If you delete the currently active conversation, a new session will automatically start
Note: User-based Sessions requires authenticated access. The user's identity is extracted from their authentication token.
Accessing User Information in Flows
When User-based Sessions is enabled, you can retrieve the current user's information within your bot flows using the tracker API:
user = tracker.get_user()
This returns a User object with the following properties:
id- The unique user identifierusername- The user's username (usually his email adress)name- The user's display name
Returns None if User-based Sessions is disabled.
Configuring Tags
Tags are the primary mechanism for filtering and focusing your bot's knowledge responses. When users select tags in the Knowledge Manager interface, the bot prioritizes knowledge entries tagged with those same tags.
How Tags Work
- Knowledge entries are tagged in Content → Knowledge (e.g., "HR", "Technical", "Billing")
- You select which tags should be available in the Knowledge Manager
- Users choose one or more tags when chatting
- Tags will be added to every user message as slot
knowledgeManagerTags(will be empty when no tags selected).
This creates focused, context-aware conversations tailored to specific domains or departments.
Adding Tags to Knowledge Manager
In the Available Tags section:
- Type a tag name in the input field and press Enter, or
- Select from existing tags in your knowledge base
- Tags appear as color-coded badges
- Click the X to remove a tag
Example tag configuration:
Selected Tags:
- HR Policies (blue)
- Technical Documentation (green)
- Billing Information (orange)
- Company Procedures (purple)
Managing Tags
Click the three-dot menu on any tag to:
- Rename the tag
- Change color for visual organization
- Delete the tag (only if not in use)
Note: Tags must first exist and be assigned to knowledge entries in the Knowledge section. Creating a tag here only makes it available for selection in the Knowledge Manager—it doesn't automatically tag your knowledge.
Configuring Action Buttons
Action buttons provide one-click access to specific bot workflows. They appear persistently in the Knowledge Manager interface, making common tasks instantly accessible.
Button Types
The Knowledge Manager supports two types of buttons:
Text Buttons
- Send a message as if the user typed it
- Processed by the orchestrator (normal flow selection)
- Use for general queries or prompts
Signal Buttons
- Trigger a specific flow directly
- Bypass the orchestrator
- Use for predetermined workflows
Adding Action Buttons
In the Available Knowledge Buttons section:
- Click Add Button
- Configure the button:
- Title - Text displayed on the button
- Value - A value that will be sent when the button is clicked
- Type - Select whether you want to use the orchestrator or to directly trigger a specific flow
- Reorder buttons by dragging and dropping
Related Documentation
- Knowledge - Learn how to add and tag knowledge entries
- Website Channel - Compare with the public website channel
- Flows - Create flows that action buttons can trigger
- Tags - Detailed information about using tags in knowledge management